
Thinking about diving into solar panel installation? You're in for a treat! Setting up solar panels can be a game changer for your energy bills and the environment. Plus, it’s pretty straightforward if you break it down into manageable steps.
First things first, start by assessing your roof. Check for any shading from trees or nearby buildings that could block sunlight. A clear, sunny roof is your best friend for effective solar panel installation. If your roof is in good shape, the next step is to determine how many panels you’ll need based on your energy usage. You can find online calculators or ask a professional to help you figure this out.
Once you know how many panels you want, it’s time to shop around! Look for quality panels that come with good warranties. Brands like SunPower and LG are popular for a reason—they last and perform well. Don’t forget to check local incentives or rebates, which can save you some cash on your solar panel installation.
After purchasing your panels, familiarize yourself with the installation process. If you’re a DIY enthusiast, this can be an exciting project. However, if you prefer to leave it to the pros, hiring a certified installer is a smart move. They’ll make sure everything is set up safely and efficiently. Remember, getting your solar panel installation right means reaping the benefits for years to come!
Tools You Need for Easy Setup
When it comes to solar panel installation, having the right tools can make all the difference. It’s not just about getting the panels up; it’s about doing it safely and efficiently. Here are some essentials you'll want to have on hand before you start.
1. Screwdrivers and Wrenches
You'll need a good set of screwdrivers and wrenches. These are crucial for securing the panels and mounting equipment. A mix of flathead and Phillips screwdrivers will cover your bases. Adjustable wrenches are also handy for tightening nuts and bolts without needing multiple fixed-size tools.
2. Drill
A cordless drill is a must-have for solar panel installation. It saves time and energy when you're making holes for mounting. Look for one with adjustable speed settings so you can easily adapt to different materials.
3. Level
A level ensures your panels are set up straight. Proper alignment not only looks nice but also maximizes efficiency. Make it a habit to check your work as you go; even small slopes can affect how well your solar panels perform.
4. Safety Gear
Don’t forget about your safety gear! A hard hat, safety glasses, and gloves will keep you protected during your solar panel installation. Climbing on roofs has its risks, so it’s better to be safe than sorry. A sturdy ladder is also key for reaching those high spots.

Anker SOLIX C1000 Portable Power Station & Solar Panel
Get portable power anywhere with this solar panel and power station combo that keeps your devices charged on the go
Product information
Product Review Score
4.77 out of 5 stars
106 reviewsProduct links
Step by Step Installation Process
Ready to dive into solar panel installation? Let’s break it down into simple steps. Getting everything in place might seem a bit tricky, but once you get the hang of it, you’ll feel like a pro. Here we go!
First off, gather your materials and tools. You’ll need solar panels, mounting brackets, a power inverter, wiring, and all those fun little connectors. Plus, make sure you have some basic tools like a drill, level, and a wrench. Having everything at your fingertips will make the job smoother.
Next, pick the perfect spot for your solar panels. Ideally, you want a south-facing roof with no shade. More sunlight means better energy production. Once you’ve chosen the location, set up your mounting brackets. They need to be sturdy and secure, so don’t rush this part. Double-check that everything is level before you move on.
Now it’s time to attach your solar panels to the brackets. Follow your manufacturer’s instructions to securely fit them in place. After that, you’ll connect the panels. Make sure to use the right wiring and follow safety protocols. If you’re not sure about wiring, it might be a good idea to consult a pro to avoid any headaches.
Finally, connect your power inverter and get everything wired to your electrical system. This is where the magic happens—your solar panels start making electricity! Don’t forget to test everything once it’s all hooked up. With a little patience and attention to detail, your solar panel installation will be complete, and you’ll be on your way to harnessing the power of the sun.
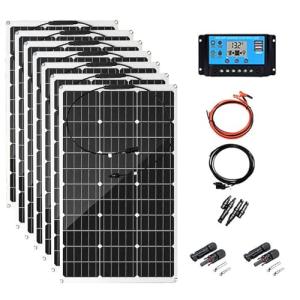
300W 12V Monocrystalline Solar Panel Kit with Controller
Power your home with this efficient solar panel kit that's easy to set up and perfect for everyday use
Product information
$758.23
Product Review Score
4.53 out of 5 stars
113 reviewsProduct links
Common Mistakes to Avoid During Installation
Jumping into Solar Panel Installation can feel really exciting, but there are a few common mistakes that can make the process trickier than it needs to be. Let's break down what to watch out for, so you can nail it the first time!
First, don’t skip the site assessment. Checking your roof's condition before installation is a must. If your roof needs repairs, now is the time to fix that. You don’t want to install panels on a roof that’s on its last legs.
Next, pay attention to the positioning of your solar panels. Make sure they're placed in a spot that gets plenty of direct sunlight. Avoid shading from trees or buildings. If your panels don’t get enough sun, they won’t perform optimally.
Also, it’s super important to double-check your electrical connections. A common mistake is not ensuring everything is wired correctly. Take your time with this step; it’s a lot easier to catch mistakes now than later. If you’re unsure, don’t hesitate to call in a pro.
Lastly, remember to review your local permits and codes. Each area has its own rules about Solar Panel Installation. Ignoring this can stall your project or even lead to fines. Stay informed and keep everything above board!


