
Picking the right solar panels can feel like a big task, but it doesn’t have to be! Start by figuring out your energy needs. Consider how much electricity you use. This will help you decide on the number of panels you’ll need. If you have a large family or use a lot of energy-consuming devices, you'll want to look for panels that generate enough power to cover your needs.
Next, take a good look at the efficiency ratings. Higher efficiency means your panels will produce more energy in less space. This is super handy if you don’t have a sprawling roof. Most panels fall between 15% to 22% efficiency. Aim for something in the higher range if you can!
Don’t forget to check warranties. Quality panels usually come with solid warranties, often up to 25 years. These warranties show confidence in the product’s durability and performance. You're making a long-term investment, so you want something that will last.
Also, think about your roof’s direction and angle. Ideally, your panels should face south and have a tilt for maximum sunlight exposure. But if your roof isn’t perfect, don't stress! There are great options for different setups that can work for you.
Finally, consider your budget. Solar Panel Installation can vary in cost, but you also want to factor in the long-term savings on your energy bills. Look for solar panels that fit your budget but still offer good value. Shopping around and reading reviews can help you make the best choice.
Tools You Need for Easy Installation
Getting your solar panel installation done right starts with having the right tools. You don’t need to be a professional to make it happen, but a few essential tools can make this project a lot smoother. Here’s what you'll want to have on hand.
First off, a good quality drill will save you tons of time. You'll need it to secure the solar panels to your roof or the mounting structure. Choose a cordless drill, as it's more convenient and gives you the flexibility to move around without being tethered to an outlet.
Next, grab some basic hand tools like a level and a socket set. A level ensures your panels are straight, maximizing efficiency and aesthetics. The socket set is perfect for tightening bolts and screws securely, which is crucial for keeping everything in place during windy days.
Don't forget safety gear! Safety glasses and gloves are a must. You’ll be working at heights and handling tools, so a little precaution goes a long way. A ladder is also essential, of course. If you can, use a sturdy extension ladder to reach those tricky spots on your roof safely.
Finally, having a good measuring tape by your side will help you get the right dimensions. Accurately measuring the space for each solar panel installation prevents costly mistakes and ensures everything fits as it should. With these tools, you’ll be well on your way to mastering solar panel installation.
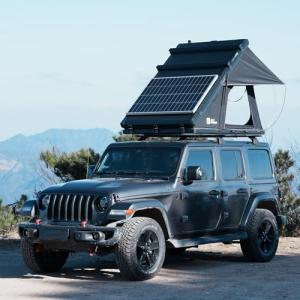
Arctwonder Rooftop Tent with Solar Panel
Experience outdoor adventures with the convenience of solar power right on your tent
Product information
$1,198.00
Product Review Score
4.26 out of 5 stars
170 reviewsProduct links
Step by Step Solar Panel Setup
Getting your solar panel installation right doesn't have to be a headache. Let’s break it down into simple steps. You'll be amazed at how straightforward it can be!
Step 1: Gather Your Tools and Materials
Before you dive in, make sure you’ve got everything on hand. Here’s a quick list:
Step 2: Choose the Right Spot
Your solar panel installation needs a sunny spot. Look for a location that gets plenty of sunlight throughout the day. Avoid trees, buildings, or anything else that could cast a shadow. A south-facing roof is often a great choice.
Step 3: Install the Mounting Brackets
Once you’ve picked the location, it’s time to set up the mounting brackets. Follow the manufacturer's instructions carefully. Use your drill to secure them, making sure they’re nice and tight. This is where the panels will sit, so you want them solid!
Step 4: Connect the Panels
Now for the fun part! Attach the solar panels to the brackets. Depending on your setup, you may need to connect them in series or parallel. Follow the instructions provided with your panels for the best results. Don’t forget to connect the inverter, too!
After that, double-check all your connections. A little care now will save you headaches down the line.
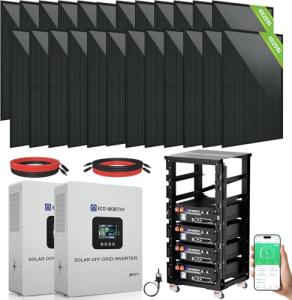
ECO-WORTHY 10kW Off-Grid Solar Power Kit
Get everything you need for a complete solar setup to power your home or cabin efficiently
Product information
$10,743.00
Product Review Score
4.38 out of 5 stars
121 reviewsProduct links
Common Mistakes to Avoid When Installing
When diving into solar panel installation, it’s easy to make a few common mistakes that can cost you time and money. Here are some pitfalls to watch out for so you can get it right the first time.
First off, don’t skimp on research. You need to know your roof's orientation and shading. A roof that’s mostly shaded won’t be ideal for solar panel installation, and it can seriously affect your energy output. Spend a good amount of time checking where the sun hits your roof throughout the day. Also, getting familiar with your local building codes and permits can save you a lot of headache later.
Another mistake is not planning your layout properly. Think about how many panels you need and where they'll go. Your panels should be placed to optimize sunlight exposure. If you're not careful, you might end up with a setup that looks messy or is less efficient. Use a layout that keeps things organized and makes the most out of your available space.
Finally, don't overlook safety. If you're climbing on roofs or handling heavy panels, make sure you have the right gear and a buddy to help. Solar panel installation isn't just about putting panels up; it’s about doing it safely. Wearing proper protective equipment is key, and don’t hesitate to ask for help when you need it.


