
If you're thinking about solar panels, you’re in for a treat! Getting started with solar panel installation can seem overwhelming, but trust me, it’s easier than it sounds. Let’s break it down into simple steps that anyone can follow.
First, figure out how much energy you use. Check your electricity bills to see your average monthly usage. This number will help you determine how many solar panels you'll need to meet your energy needs. Don't worry if you're not a math whiz; there are plenty of online calculators that can help you out!
Next up is choosing the right solar panels. You’ll want to look for panels that fit your budget but also offer good efficiency and warranties. Brands vary widely, so do a little research before settling on one. Ask friends or neighbors who have panels, or join a local online group for advice. Their experiences can guide you toward a solid choice.
Once you’ve got your panels picked out, it’s time for the installation! You can totally DIY it, but hiring a pro might save you headaches in the long run, especially with the permits and inspections. A qualified installer will take care of the heavy lifting and ensure everything is up to code. This way, you can kick back and relax knowing it’s done right!
Lastly, don’t shy away from state and federal incentives! Many places offer rebates or tax credits for solar panel installation, which can save you a chunk of change. Check with local authorities or your solar provider to see what’s available. Getting started with solar panels can transform your energy use and even lower your bills, so let’s get going!
Choosing the Right Solar Panel Kit
Next up, consider the space you have available. Not every roof can fit the same number of panels. Measure your roof and know how much area you can dedicate to solar panels. Some kits are better for smaller spaces, so if you have limited roof real estate, look for compact but efficient options.
Don’t forget to think about efficiency ratings. Higher efficiency means you get more power from the same amount of sunlight. It’s a key factor for many homeowners. Aim for panels with at least a 15-20% efficiency rate for a solid return on your investment.
Lastly, check the warranty offered by the manufacturer. A good warranty not only protects your investment but also indicates the company’s confidence in their product. Look for warranties that last at least 25 years. It shows they’re built to last through all kinds of weather, which is super important for solar panel installation.
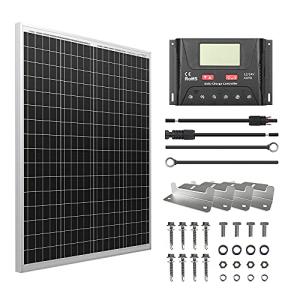
HQST 100W Solar Panel Kit with Charge Controller
Power your adventures with sustainable energy and keep your devices charged anytime, anywhere
Product information
$164.99
Product Review Score
4.29 out of 5 stars
229 reviewsProduct links
Step by Step Installation Process
If you’re ready to dive into your solar panel installation, let’s break it down step by step. This way, you’ll feel confident and organized as you tackle the whole process. Here’s what you need to know:
Step 1: Planning and Permits
Before anything else, take some time to figure out your energy needs and how many solar panels you’ll need. Check your roof's condition and orientation, too; south-facing roofs usually get the most sun. Once you have a plan, grab the necessary permits from your local authority. It’s sometimes more straightforward than you think!
Step 2: Gather Your Materials
You’re going to need some gear! Get your solar panels, inverter, mounting hardware, and wiring. Don’t forget some basic tools like a drill, screwdriver, and maybe even a ladder if you’re comfortable working up high. If you’re missing something, most hardware stores can help you find what you need.
Step 3: Mounting the Panels
Once you have everything ready, it’s time to get those panels up. Start by installing the mounting brackets on your roof. Then, securely attach the solar panels to these brackets. Make sure everything is level and locked in place. Take your time here—good mounting means better durability and performance.
Step 4: Wiring and Connecting
Now for the fun part! Connect the solar panels to the inverter using the wiring you gathered earlier. Make sure all connections are tight and weatherproof. This step is crucial for getting your system up and running. Once everything is wired up, connect it to your home's electrical system.
Step 5: Final Checks and Testing
Double-check that everything is secure and safe. Before you call it a day, test the system to make sure it’s working as it should. Turn on your inverter, and check the energy output. If you see the numbers going up, congratulations! You’ve successfully completed your solar panel installation.
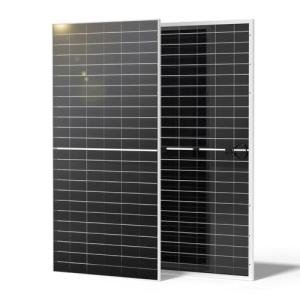
Renogy 1180W N-Type Bifacial Solar Panels – 2 Pack
Get bright energy from both sides with these efficient solar panels designed for maximum power generation
Product information
$1,475.35
Product Review Score
4.47 out of 5 stars
128 reviewsProduct links
Tips for Maintenance and Performance
Keeping your solar panels in top shape means you'll enjoy the most benefits from your solar panel installation. Here are some simple tips to help you maintain their performance.
First off, keep an eye on cleanliness. Dust, leaves, and bird droppings can mess with how efficiently your panels work. A gentle rinse with a hose once in a while can help wash away dirt. If you notice stubborn spots, a soft brush with a bucket of soapy water does wonders. Just make sure to do this on a cooler day, so the soap doesn’t dry too quickly!
Next, check for shade. Trees and buildings that grow can block sunlight, reducing the energy generation of your solar panel installation. If things get too shady, consider trimming trees or moving any obstructions away from your panels.
Lastly, keep an eye on the performance. Monitor your energy production regularly. Most systems come with an app or a digital display, so you can track how much energy you're generating. If you notice a big drop in performance, it might be time to get a professional to take a look.


