
Choosing the right solar panels can feel overwhelming, but it doesn’t have to be! Start by figuring out your energy needs. Think about your average electricity bill and how much energy you use each month. This helps you determine how many panels you’ll need for your solar panel installation.
Next, consider the type of solar panels available. There are mainly two types: monocrystalline and polycrystalline. Monocrystalline panels are often more efficient and take up less space, making them a great choice if you have limited roof space. Polycrystalline panels are typically more budget-friendly but may require more area for the same energy output. Choose what fits your situation best.
Don’t forget about the warranty! A good warranty shows the manufacturer stands behind their product. Look for panels with at least a 25-year warranty on performance and materials. This gives you peace of mind that your solar panel installation will be a solid investment for years to come.
Also, take note of the efficiency ratings. Higher efficiency panels produce more energy and can save you money in the long run. Check how well the panels perform under different weather conditions too. Some panels handle shade and heat better than others, which is essential depending on where you live.
Lastly, research trusted brands. Read reviews and ask friends or neighbors about their experiences. Local installers usually have insights on which products perform best in your area. By doing a bit of homework, you’ll find the perfect solution for your solar panel installation!
Preparing Your Roof for Installation
Getting your roof ready for solar panel installation is an important step that can make the process smoother. Start by checking the condition of your roof. Is it sturdy and in good shape? If your roof is old and needs repairs, it’s best to take care of that first. After all, you want your solar panels to last as long as they can without any issues.
Next, consider the orientation and angle of your roof. South-facing roofs typically get the most sunlight, which means they’re ideal for solar panels. If your roof isn’t facing south, don’t worry! You can still install panels on east or west-facing roofs. Just know that the energy production might vary a bit.
Also, think about any overhanging branches. Trees can create shade that reduces the effectiveness of your solar panels. Trim any branches that might block sunlight, or consider removing trees that obstruct the sun from reaching your panels. Keep in mind that solar panel installation is all about maximizing sunlight exposure.
Lastly, check your roof’s load capacity. Solar panels add some weight, and your roof should be able to handle it. If you're unsure, a professional can help assess if your roof can support the additional weight. A little prep work now will set the stage for a hassle-free solar panel installation later on.
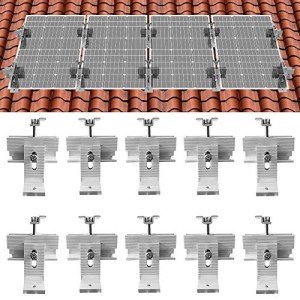
ECO-WORTHY Solar Panel Roof Mounting Bracket Kit
Easily install solar panels on your roof with this durable mounting bracket kit
Product information
$54.99
Product Review Score
4.83 out of 5 stars
210 reviewsProduct links
Step by Step Installation Process
Installing solar panels might seem a bit daunting, but breaking it down into steps makes it way easier! Let's get into the nitty-gritty of the solar panel installation process so you can get those panels up and running in no time.
First things first, you’ll want to do your homework. Check local regulations and permits. Sometimes, you'll need to get permission for solar panel installation from your city or homeowners association. Don’t skip this step—it's super important to avoid a headache later!
Next, gather your materials. You'll need solar panels, mounting brackets, an inverter, wiring, and possibly a battery if you’re going for a storage setup. Make sure you have all the tools on hand too, like a wrench, drill, and safety gear. No one wants to stop midway because they forgot a screwdriver!
Now it’s time for the setup. Start by installing the mounting brackets on your roof or ground surface. Make sure they’re level and secure. From there, you’ll attach the solar panels to these brackets. This part is usually straightforward, but don’t be shy about asking for a friend to help out. It’s always easier with an extra pair of hands!
After the panels are secured, connect the inverter and wiring. This is where the magic happens, as the solar energy gets converted into usable electricity. If you’re not super handy, consider hiring a professional for this part. A little help ensures your solar panel installation works smoothly and safely!

100W Monocrystalline Solar Panel for Off-Grid Use
Harness the power of the sun for efficient energy solutions in remote locations
Product information
$114.99 $67.99
Product Review Score
4.38 out of 5 stars
156 reviewsProduct links
Tips for Maintaining Your Solar System
Keeping your solar system in top shape doesn’t have to be complicated. Just a few easy steps can help you maintain your solar panels and ensure they’re working efficiently. After all, proper maintenance can prolong the life of your system and maximize your investment in solar panel installation.
First off, keep an eye on dirt and debris. Dust, leaves, and even bird droppings can block sunlight and reduce efficiency. A quick rinse with water can do wonders. If you’re comfortable with it, you can wash them yourself with a soft brush and soapy water. Otherwise, hiring a professional to clean your panels a couple of times a year is a smart choice.
Check for shading. Even a small shadow from a tree or nearby building can impact performance. If you notice any obstructions, trim those branches or relocate any items that might block sunlight. This small adjustment can make a big difference in how well your system works.
Monitor your system’s performance regularly. Most solar installations come with a monitoring system that lets you track energy production. If you notice a drop in output, it might signal that something’s wrong. Don’t hesitate to contact your installer to troubleshoot any issues. Staying proactive can save you headaches down the line.


