
Getting started with solar panel installation can seem a bit overwhelming, but it’s really all about understanding what you need. First things first, consider your energy consumption. How much electricity do you use on a monthly basis? This will help determine how many solar panels you'll need. You can check your electric bills for an average figure. Knowing this will guide you in making a smart choice.
Next, think about your roof space. Do you have enough area to install the panels? Ideally, you want a spot with direct sunlight for most of the day. If your roof has too many trees or is shaded, you might need to look at other options, like ground-mounted panels. Don’t worry, there are plenty of ways to make it work as long as you assess your space wisely.
After that, check out your local solar incentives and rebates. Most places have programs that can help lower the upfront cost of solar panel installation. This can make a huge difference in your budget, so don’t miss out on those savings! Every little bit helps when you're investing in solar energy.
Lastly, think about the brand and type of panels you want. There are different styles and efficiencies out there, so doing a bit of research can pay off. Some panels are designed for better performance in shaded areas, while others are made for maximum efficiency. Choose the one that fits your specific situation best. Finding the right match is key to enjoying the benefits of your solar panel installation!
Choosing the Right Solar Panels
Next up, consider the types of panels available. Monocrystalline panels are sleek and highly efficient, making them a great choice if you’re short on space. On the other hand, polycrystalline panels are budget-friendly and do well in wide-open areas. If being eco-friendly is important to you, look into thin-film panels. They’re lightweight and can be installed in various places.
Don’t forget about the warranty! A solid warranty usually indicates quality. Look for panels with at least a 25-year performance warranty. This way, you know you’re investing in something durable. After all, solar panel installation is a big commitment, and you want to make sure it lasts.
Lastly, check the brand’s reputation. Read reviews, ask around, and see what others are saying. A company known for outstanding customer service can make all the difference if you run into any issues during or after your solar panel installation.
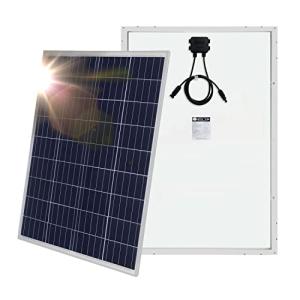
Mighty Max 100W 12V Waterproof Solar Panel Charger
Harness the power of the sun with this durable and efficient solar panel charger designed for all your outdoor energy needs
Product information
$101.83
Product Review Score
4.79 out of 5 stars
43 reviewsProduct links
Step by Step Installation Process
Let’s jump right into the fun part—installing those solar panels! Here’s a simple step-by-step guide to make your solar panel installation as smooth as possible. You don’t need to be an expert; just follow along, and you’ll be on your way to harnessing sunlight in no time!
First up, gather your tools. You’ll need basic tools like a drill, screwdriver, a level, and some safety gear. Don’t forget to check your solar panels and other equipment before you start. Make sure you have everything you need to avoid extra trips to the hardware store.
Next, decide where you want to place your solar panels. Look for a sunny spot on your roof or in your yard. The goal is to get maximum sunlight exposure. Clear away any obstacles like branches or debris that could block the sun. Once you've found the perfect spot, mark the installation points. Use your level to ensure everything lines up just right.
Now it’s time for the installation. If you’re on the roof, be extra careful! Lay down the mounting brackets first, making sure they're tightly secured. Next, attach the solar panels to the brackets. Most panels come with easy-to-follow instructions, so stick with those. Once the panels are up, connect the wiring. It sounds tricky, but those cables usually have color-coded connectors to help you out.
Finally, check everything over before you turn it on. Make sure all connections are tight and secure. Once you feel good about it, fire it up! Watch your meter spin in reverse as your new solar setup starts generating power. It’s a satisfying moment that makes all the hard work worth it! With this step-by-step solar panel installation process, you’re well on your way to going solar!
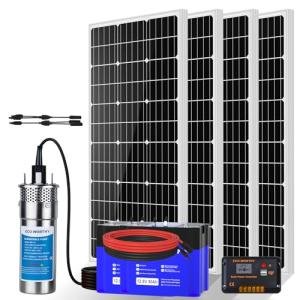
ECO-WORTHY 24V Submersible Solar Well Pump Kit
Power your water needs sustainably with this easy-to-install solar well pump kit
Product information
$699.99
Product Review Score
4.53 out of 5 stars
168 reviewsProduct links
Tips for Successful Solar Panel Setup
Getting your solar panels set up can be a breeze if you keep a few tips in mind. First off, location is key. Pick a spot with plenty of sunlight throughout the day. Avoid shaded areas from trees, buildings, or anything else that might block those rays. The better your sunlight access, the more energy you’ll capture.
Next, consider the angle of your panels. Tilt them at an angle that matches your latitude for optimum efficiency. This typically helps in capturing the most sun. You don’t have to have them flat on the roof; a slight tilt can make a big difference in how much energy you generate.
Make sure you have the right equipment too. Quality solar panels, inverters, and mounting systems are all important. Skimping on these can lead to issues down the line. Investing a bit upfront can save you lots of hassle and money later.
Don’t forget about permits and local regulations. Before you dive into solar panel installation, check with your local government. Sometimes, you might need permits, and it’s good to know the rules upfront to avoid surprises later. Planning can save you time and frustration.
Lastly, consider getting a professional to help with the installation if you're unsure about any step. It’s totally okay to ask for help. Pros can ensure everything’s up to code and working efficiently. With these tips, you’re on your way to a successful solar panel installation!


