
Thinking about solar panel installation? Great choice! It's a smart way to save on energy costs and reduce your carbon footprint. Let’s break down what you need to know to get started on this exciting journey.
First off, the location of your solar panels matters. Look for a sunny spot on your roof that gets plenty of sunlight throughout the day. If your roof has shady spots or faces the wrong direction, don’t worry too much. You can still work with a professional who can help you find the best solution. They can assess your property and recommend the right setup.
Next, consider how much energy you actually use. You’ll want to look at your past utility bills to figure out how much energy you need to generate. This info will help determine the size and number of panels you'll need to install. The goal here is to offset your energy consumption as much as possible.
Once you've got a good idea of your needs, it’s time to explore your options. There are different types of solar panels out there, like monocrystalline and polycrystalline. Each has its perks, so take some time to do your research. Some panels are better for limited space, while others are more budget-friendly.
Don't forget about the installation process itself! If you're comfortable with a bit of DIY, you could tackle this yourself, but getting help from experts is usually the best route. They can ensure everything is done safely and efficiently, plus they’ll make sure you're in compliance with local regulations. So find a trustworthy contractor, and get ready to harness that sunshine!
Choosing the Right Solar System
Next, consider your roof. The type and angle of your roof can make a big difference. If it’s flat, sloped, or has lots of shading from trees or nearby buildings, it changes how much sunlight your panels will get. You want to ensure your solar panels can soak up as much sun as possible throughout the day. If you're unsure about the angles, reach out to a local installer. They can help with a site assessment.
Also, check out different panel types. There are a few options out there: monocrystalline, polycrystalline, and thin-film panels. Monocrystalline panels offer high efficiency and performance, while polycrystalline panels tend to be a bit cheaper but take up more space. Thin-film panels are lightweight and flexible but usually have lower efficiency. Think about what fits your goals and budget best.
Don’t forget about your budget and financing options. Solar Panel Installation can save you money in the long run, but the upfront cost can be daunting. Look into local incentives, tax credits, or financing plans that help offset initial costs. Many companies offer flexible options that make it easier for you to go solar without breaking the bank.
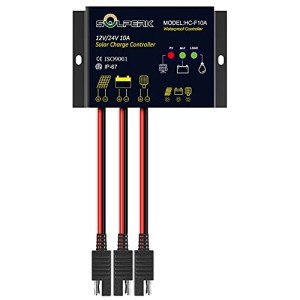
SOLPERK 10A Waterproof Solar Charge Controller 12V/24V
Take control of charging your batteries with this reliable and waterproof solar charge controller
Product information
$26.99 $19.99
Product Review Score
4.59 out of 5 stars
128 reviewsProduct links
Step by Step Installation Process
Thinking about solar panel installation? You're in the right spot! Let’s break down the steps so you can get your solar panels up and running without a hitch.
First things first, you need to pick the right location for your solar panels. Look for a spot that gets plenty of sunlight, ideally, somewhere clear of trees and tall buildings. Once you’ve chosen the perfect spot, it’s time to gather your tools and materials. You’ll typically need mounting brackets, screws, a drill, and, of course, your solar panels.
Next, attach the mounting brackets to your roof. Make sure they’re spaced evenly to support the solar panels properly. After that, it's time to install the solar panels onto those brackets. This part can feel a bit tricky, but just take your time and follow the instructions from the manufacturer. Once everything is securely in place, connect the panels to the inverter.
Finally, connect the inverter to your home’s electrical system. This usually involves some wiring, so if you’re not comfortable with that, you might want to call in a pro. After everything is hooked up and checked, turn on the system, and voilà! You’re now harnessing the power of the sun. Enjoy those energy savings!
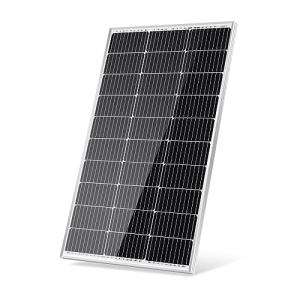
Traver Force 100W Monocrystalline Solar Panel
Experience reliable energy generation with the efficient and durable Traver Force 100W Monocrystalline Solar Panel
Product information
$59.99
Product Review Score
4.66 out of 5 stars
201 reviewsProduct links
Connecting to Your Home Energy System
Once you've got your solar panels up, it’s time to connect them to your home energy system. This step may sound tricky, but it’s really just about making sure everything works together. You’ll want to ensure your panels are working efficiently, so proper connections are key.
First, consider your inverter. This little device is crucial because it converts the energy your solar panels generate into usable electricity for your home. Depending on your setup, you might go for a string inverter, microinverters, or even power optimizers. Each option has its perks, but either way, the inverter needs to be properly connected to your electrical panel.
Next, you want to think about how your new solar panel system will sync up with your utility grid. If you're going for a grid-tied system, you’ll likely need to work with your utility company to finalize the connection. They might come out to inspect your setup and make sure it meets safety standards. This step helps you enjoy solar power while still having access to the grid when needed.
Don’t forget about your battery storage options! If you're looking for more independence from the grid, adding solar batteries could be a smart move. They store excess energy generated during the day so you can use it at night or during cloudy weather. Connecting these batteries into your system will give you a reliable backup and maximize your solar investment.


