
When it comes to solar panel installation, choosing the right type of solar panel can make a big difference in performance and efficiency. You mainly have three types to consider: monocrystalline, polycrystalline, and thin-film panels. Each type has its own perks, so let’s break it down.
Monocrystalline Panels are the go-getters in the solar world. They’re known for their high efficiency and sleek black appearance. If you’re short on roof space or want to get the most energy out of your panels, these might be your best bet. They last a long time, typically give you more power for your investment, and look great while doing it.
Polycrystalline Panels come in a bluish hue and are generally a little less efficient than monocrystalline. However, they’re often cheaper and do a solid job. If your roof has enough space, these panels can be a smart choice. They might not perform as well in low-light conditions, but they still get the job done and can save you some cash upfront.
Thin-Film Panels are flexible and lightweight, making them easy to install in various locations. Though they have lower efficiency compared to the other two types, they perform well in heat and shade. If you’re working with a unique installation scenario or need panels on a larger surface, thin-film might just fit the bill.
Tools You Need for Installation
Getting ready for your solar panel installation? You’ll want to have the right tools on hand to make the process smoother. Here’s a handy list of what you’ll need before you dive in.
Start with the basics:
Don’t forget the safety gear:
If you want to get a bit fancy:
With these tools in your toolkit, you’ll be ready to tackle your solar panel installation like a pro! Gathering everything in advance saves you time and keeps the project moving smoothly.
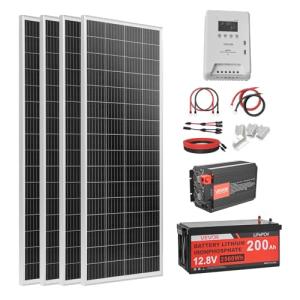
400W Solar Power Kit with 200Ah Battery
Get ready to harness the sun’s energy and power your home with this complete solar power kit!
Product information
$999.99
Product Review Score
4.21 out of 5 stars
103 reviewsProduct links
Step-by-Step Installation Process
Getting started with solar panel installation doesn’t have to be overwhelming. Here’s a simple step-by-step process to help you understand what to expect.
1. Assess Your Roof: Check your roof’s condition and orientation. Make sure it’s in good shape and gets plenty of sunlight. South-facing roofs are ideal, but east and west can work too.
2. Choose Your Panels: Research different solar panels and find ones that fit your budget and energy needs. Look for panels with a good efficiency rating and solid warranties.
3. Gather Your Tools: Get everything you need ready. You’ll need a ladder, drill, brackets, and some safety gear. Make sure you have everything on hand so you don’t have to run back and forth.
4. Install the Mounting System: Start with mounting the brackets or rails on your roof. This is what your solar panels will attach to. Make sure they're level and secure—this is key for a good installation.
5. Attach the Panels: Once the mounting system is up, it’s time to mount your panels. Follow the manufacturer's instructions carefully. Making sure they’re aligned right will help you get the best sun exposure.
6. Connect to the Inverter: After your panels are secure, wire them to the inverter. This turns the solar energy into usable electricity for your home.
7. Final Checks: Before you call it a day, double-check everything. Ensure all connections are tight and that the system is ready to go. You’ll want to feel confident about your solar panel installation!
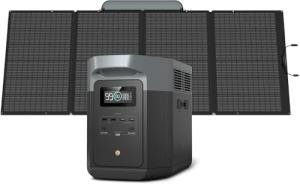
EF ECOFLOW DELTA 2 Max Portable Solar Generator
Power your adventures with this lightweight solar generator that keeps your devices running wherever you go
Product information
$1,243.00
Product Review Score
4.17 out of 5 stars
104 reviewsProduct links
Tips for a Smooth Setup
Getting your solar panels set up can feel a bit overwhelming, but it doesn’t have to be! Here are some tips to make your solar panel installation smooth and straightforward.
First off, gather all your tools and materials before you dive in. You’ll need basic tools like a screwdriver, wrenches, and a level. Make sure you review the installation manual that comes with your solar panels. It usually has all the specific steps you need to follow. Having everything ready saves you from running back and forth looking for supplies.
Next, pick the right spot for your solar panels. Look for an area that gets plenty of sunlight throughout the day. Shade from trees or buildings can really hurt their performance. If possible, aim for a south-facing slope; this is usually the best angle to catch those sunny rays. If you’re not sure, don’t hesitate to ask an expert for advice on the right placement.
Once you’re ready to start, take it step by step. Follow the instructions carefully and keep track of where everything goes. It’s easy to mix things up, especially if you’re working with a large number of components. Taking photos as you go can help keep everything organized, especially when it’s time to connect those wires!
Lastly, don’t rush it. Solar panel installation is a task that takes time and patience. If you hit a snag, it’s okay to pause and reassess. If you feel stuck, there are plenty of online resources and communities where you can ask for help. Taking your time ensures everything is done correctly, and you’ll be enjoying the benefits of solar power in no time!


