
Thinking about solar panel installation? Great choice! It’s a fantastic way to save money on electricity and do your part for the environment. Getting started is easier than you might think, and I’m here to walk you through the basics.
First things first, take a good look at your roof. You want a space that gets plenty of sunlight throughout the day. If your roof has some shady spots from trees or buildings, you might not get the best results. A quick inspection can help you decide if solar panels are the right fit for you.
Next up, check local regulations and incentives. Some areas offer awesome rebates or tax credits for installing solar panels. Doing a bit of homework here can save you quite a bit of cash. If you’re unsure where to start, local solar companies usually have great resources to help you navigate these details.
Once you're set with the basics, consider your budget and financing options. Solar panel installation can feel like a big investment upfront, but there are numerous financing plans available. Some people go for loans, while others might lease their solar panels. Think about what works best for your financial situation.
Finally, reach out to local installers to get quotes and understand your options. Speaking directly with a few companies can give you a better idea of the costs involved and help you pick a quality team for your solar panel installation. With the right help, you’ll be enjoying clean energy in no time!
Choosing the Right Equipment
When diving into solar panel installation, picking the right equipment makes all the difference. You'll want solar panels that fit your energy needs and space. Think about your roof size, shading, and how much sunlight hits your home. Choosing a reliable brand can also go a long way. Look for reviews, warranties, and company support. The last thing you want is a headache down the line.
Next up, don’t forget about inverters. They play a crucial role by converting the direct current (DC) from your solar panels into usable alternating current (AC) for your home. Microinverters or string inverters are popular choices. Microinverters work well if you have shaded areas or different roof angles, while string inverters are often simpler and more affordable if your roof gets consistent sunlight.
And let’s not overlook the mounting systems! You’ll need a solid way to attach your solar panels securely. Roof mounts, ground mounts, or even pole mounts each come with pros and cons. Think about your space and installation preferences. A good mounting system can make installation easier and keep your panels safe from weather conditions.
Lastly, consider any additional accessories like battery storage or monitoring systems. Battery storage lets you save up energy for later use, which can be handy during power outages. Monitoring systems help you keep track of your energy production, so you can see how well your solar panel installation is performing. Take some time to weigh your options, and you’ll set yourself up for success!
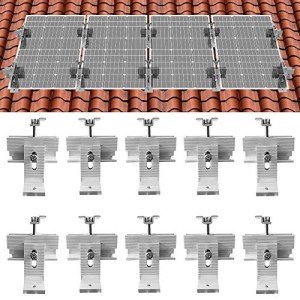
ECO-WORTHY Solar Panel Roof Mounting Bracket Kit
Easily install solar panels on your roof with this durable mounting bracket kit
Product information
$54.99
Product Review Score
4.83 out of 5 stars
210 reviewsProduct links
Installation Steps Made Simple
Getting your solar panels installed doesn’t have to be a headache. Here’s a simple breakdown of the solar panel installation steps that make the process breezy. You can do this!
1. Choose Your Location
Find a spot that gets plenty of sunlight. Ideally, your panels should face south, but southeast or southwest can work too. Just make sure there are no tall trees or buildings blocking the sun.
2. Gather Your Tools
Before diving in, collect everything you need. You’ll want a drill, screws, a ladder, and a measuring tape. Double-check that you have all the necessary equipment to avoid any last-minute runs to the hardware store!
3. Secure Your Mounting System
Start with the mounting brackets. Attach these to your roof or the ground, depending on your choice of installation. Be sure to follow the manufacturer’s instructions closely; this is crucial for a stable setup.
4. Connect the Panels
Once the mounts are secure, carefully place the panels onto the brackets. Connect the panels in series or parallel, depending on your system’s design. Make sure you’re following the wiring diagrams provided with your panels. This step is where you take charge of your solar panel installation!
5. Testing and Verification
After everything is in place, it’s time to test your system. Switch it on, and check that everything functions properly. Enjoy watching those energy savings roll in!
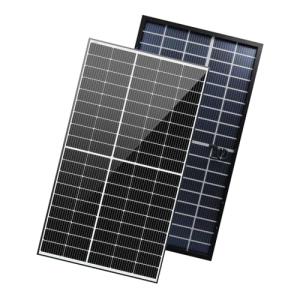
Renogy Bifacial 320W Solar Panels (2-Pack)
Power up your home with these efficient and versatile solar panels that harness sunlight from both sides
Product information
$677.40
Product Review Score
4.4 out of 5 stars
213 reviewsProduct links
Tips for a Successful Setup
Setting up your solar panels doesn’t have to be a headache. A smooth Solar Panel Installation starts with the right planning. Here’s how to make it easier.
First things first, check your roof. Make sure it’s in good shape and can handle the panels. If your roof needs repairs, it’s best to fix that before you install solar panels. A little prep work now can save you a lot of hassle later on.
Next, pick the best spot for your panels. You want them where they'll get the most sunlight. This usually means facing south if you're in the northern hemisphere. Trim back any trees or obstacles that could create shade. Sunlight is key for a successful Solar Panel Installation!
Don’t forget about the wiring and inverters. These are crucial for your system to convert sunlight into usable energy. Make sure to follow the installation manual closely, or consider getting help from a professional if you’re unsure.
Finally, check local regulations and permits. Different areas have different rules about solar panels. Knowing the ins and outs upfront will keep your Solar Panel Installation on track and legal. It’s all about getting it right from the start!


