
Picking the right solar panels can feel overwhelming with all the choices out there. But don’t sweat it; just keep a few key things in mind. First off, think about your energy needs. You want solar panels that can meet your household’s power requirements without breaking the bank. It’s all about finding that sweet spot!
Next up, check out the efficiency ratings. Higher efficiency means more power from less space. If you have a smaller roof, this is super important. Look for panels with at least a 15% efficiency rating to get the best bang for your buck. This is especially true if you're planning on DIY solar panel installation.
Don't overlook warranties and longevity. Quality panels often come with a solid warranty, so look for at least 25 years. This tells you the manufacturer stands behind their product. You want panels that can take on the elements and keep shining for years to come.
Also, consider the type of solar panels. Monocrystalline panels are super efficient and space-saving, but they're usually pricier. On the other hand, polycrystalline options are a bit more budget-friendly, though they might require more roof space. Think about your budget and available area to find the right fit.
Lastly, research installation options. DIY solar panel installation can save you money, but a professional installer can handle any tricky parts if you’re not feeling up to it. Weigh your options and choose what feels right for you. Happy solar shopping!
Tools You’ll Need for Installation
If you're diving into solar panel installation, it’s essential to have the right tools on hand. You don’t want to find yourself halfway through the project only to realize you forgot something crucial. Let’s make sure you’re fully prepared.
First up, you’ll need a good quality drill. This is a must-have for making pilot holes and attaching brackets to your roof. A power drill speeds things up, but a manual one will work if that’s all you have. Just be ready for a workout!
Next, grab a level. This little tool might seem simple, but it’s key for ensuring your panels are aligned perfectly. You don’t want to deal with a crooked solar setup. A measuring tape is also important for marking distances and ensuring everything fits just right.
Don’t forget about safety gear! Get yourself some sturdy gloves, safety goggles, and a harness if you're working on a tall roof. It’s easy to overlook safety when you're excited about solar panel installation, but it’s super important to keep yourself safe while you work.
Finally, having a solar panel installation guide or manual handy can be incredibly helpful. You're not alone in this; many resources can walk you through each step, ensuring nothing gets missed. With these tools, you're ready to tackle your solar panel project head-on!
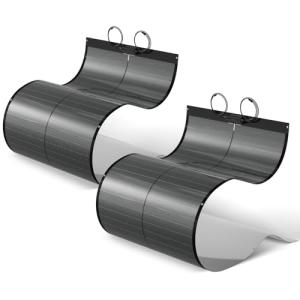
BougeRV 400W Flexible CIGS Solar Panels - 2 Pack
Maximize your energy efficiency with lightweight and versatile solar solutions perfect for any outdoor adventure
Product information
SEK 10,384.49
Product Review Score
4.09 out of 5 stars
159 reviewsProduct links
Step by Step Installation Process
Installing solar panels might seem like a big project, but breaking it down into steps makes it super manageable. Here’s how to tackle your Solar Panel Installation like a pro!
First things first, gather your tools and materials. You’ll need solar panels, mounting hardware, wiring, and some basic tools like a drill, ladder, and safety gear. Having everything on hand saves you time and keeps the process smooth.
Next, pick the perfect spot for your panels. Ideally, you want a spot that gets plenty of sunlight throughout the day. Clear any branches or obstacles that might create shadows. Once you’ve chosen the location, it’s time to mount your panels. Follow the manufacturer’s instructions carefully to ensure everything is secure.
After mounting the panels, you’ll need to connect the wiring. It’s important to follow the instructions that come with your solar panels. This usually involves connecting the panels in series or parallel, depending on your setup. Double-check your connections to avoid any hiccups.
Finally, it’s time to connect your solar power system to your inverter and then to your home’s electrical system. If you’re not comfortable with electrical work, this might be a good time to call in a pro. Once everything’s connected, turn on your system, and enjoy the sunshine-powered energy you’ve just created!
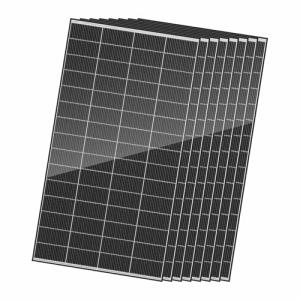
Renogy 320W Monocrystalline Solar Panel Kit 8PCS
Get reliable power with this complete kit that includes everything you need to harness solar energy
Product information
SEK 19,377.72
Product Review Score
4.93 out of 5 stars
179 reviewsProduct links
Tips for Maintenance and Care
Keeping your solar panels in top shape can really boost their efficiency and lifespan. Here are some easy tips to help you maintain your system after your solar panel installation.
First off, regular cleaning is key. Dust, dirt, and bird droppings can block sunlight and reduce power generation. A gentle rinse with a hose normally does the trick. Just be sure to do it when the panels are cool to avoid cracking. If you notice stubborn grime, a soft sponge or cloth along with some mild soap works wonders.
Next, keep an eye on the wiring and connections. Checking every few months helps you spot any wear and tear before it becomes a bigger problem. If you spot any frayed wires or loose connections, reach out to a professional for help. Safety first!
Also, don't forget to check for shading. Trees or new buildings might pop up over time, blocking those precious sun rays. If that happens, trimming back branches or re-evaluating your setup could be in order. You want those panels to soak up all the sunlight they can!
Finally, monitor your system's performance regularly. Most solar panel installations come with an app or monitoring system that lets you track energy production. If you notice a significant drop in output, it might be time to bring in an expert. It's better to catch issues early than face bigger repair costs down the line.


