
Don’t forget to check the efficiency ratings, too. This tells you how well the panel converts sunlight into electricity. Panels with higher efficiency are often more efficient and save space on your roof because they generate more power in less area. Popular brands with great efficiency ratings include SunPower and LG.
Next, consider the warranty. A good warranty can provide peace of mind. You want panels that come with a solid performance guarantee, ideally around 25 years. This way, you can be sure your investment is protected over the long haul.
Lastly, think about your budget. There’s a wide range of prices out there. You don’t always have to go for the priciest option; sometimes, mid-range panels work just fine for most households. This way, you can still enjoy the benefits of solar panel installation without breaking the bank!
Preparing Your Home for Installation
Getting your home ready for solar panel installation is a key step in embracing renewable energy. It’s all about making sure everything’s in order so the installation goes smoothly. First off, take a good look at your roof. Is it sturdy enough to handle the panels? If your roof needs repairs or replacement, it’s better to tackle that before jumping into solar. A solid roof means a longer-lasting solar setup.
Next, consider the location of your panels. Ideally, they should be on a south-facing roof for maximum sun exposure. If that’s not an option, don’t worry; east or west can work too. Just make sure there's no shading from trees or nearby buildings. If you're not sure, your installer can help assess the best spots for the optimal performance of your solar panels.
Also, it’s smart to check what’s happening inside your home. An energy audit can uncover ways to improve efficiency before your solar panel installation. By making your home more energy-efficient, you’ll reduce energy needs and get the most out of your solar panels.
Lastly, think about your electrical system. It might need an upgrade to handle the new solar setup. Your installer will check this, but if your home is older, it’s good to bring this up during your early conversations. Addressing these aspects will help your solar panel installation be as seamless as possible.
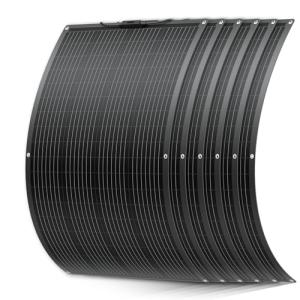
TATOODAA 200W Flexible Monocrystalline Solar Panel
Lightweight and easy to install, this solar panel is perfect for on-the-go energy needs
Product information
$799.99
Product Review Score
4.93 out of 5 stars
217 reviewsProduct links
Step by Step Installation Process
Getting your solar panels up and running doesn’t have to be a headache. Here’s a simple step-by-step installation process to help you understand what to expect during your solar panel installation.
1. Gather Your Tools and Materials
Before you dive in, make sure you have everything you need. This typically includes solar panels, mounting hardware, an inverter, wiring, and safety gear. Having everything at hand makes the process much smoother.
2. Choose Your Location
Find a sunny spot on your roof or property that gets plenty of sunlight throughout the day. This step is crucial because the efficiency of your solar panel installation hinges on how much sun they get. Clear away any obstructions like branches or debris to maximize sun exposure.
3. Install the Mounting System
Next, it’s time to secure the mounting brackets. These are the backbone of your solar panel installation. Ensure they’re properly aligned and firmly attached to hold the weight of the panels. Take your time with this step—getting it right here makes the rest of the process easier.
4. Place the Solar Panels
With the brackets set up, carefully place the solar panels onto the mounts. Make sure they’re snug and secure. Double-check the connections as you go along to avoid any loose fittings later on. After that, connect the wiring from the panels to the inverter—this is where the magic happens as your solar energy gets converted for everyday use.
5. Finalize the Setup
Finish by connecting the inverter to your home’s electrical system. This might involve some tricky wiring, so if you’re unsure, it’s smart to call in a professional. Once everything’s in place, give it a test run! Check that your panels are generating electricity and monitor their performance.
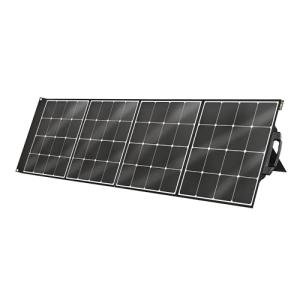
EGO SP2000 200W Solar Panel with MC4 Cables
Boost your energy savings with this portable 200W solar panel, perfect for outdoor adventures or backup power at home
Product information
$659.99
Product Review Score
4.64 out of 5 stars
40 reviewsProduct links
Maintaining Your Solar Energy System
Keeping your solar energy system in tip-top shape is super important after your solar panel installation. Regular maintenance can help you get the most out of your investment, ensuring you’re generating the energy you need without any hiccups.
One of the easiest things you can do is clean your panels. Dust, leaves, and bird droppings can build up and block sunlight. Make it a habit to check them every few months. If they’re dirty, grab a hose or a soft brush and give them a gentle wash. Just remember to do this when it’s cooler outside—early mornings or late afternoons work best!
Don’t forget to check the surrounding area. Trim any branches that could cast shadows on your panels since sunlight is key for optimal performance. Also, make sure to keep an eye on your inverter. This handy device converts solar energy into usable power. If you notice warning lights or error messages, it’s worth getting a professional to take a look.
Lastly, keep track of your energy production. Most modern systems come with apps or monitoring tools that show how much power you’re generating. If you see a dip in production, it might be time to investigate further. Regular checks and a little TLC will help your solar panels shine bright for years to come!


