
Next up, it’s time to choose the right solar panels. There are a bunch of options out there, but generally, you’ll want to look for ones that fit your budget and efficiency needs. Some brands may have slightly different warranties and performance metrics, so take some time to compare them. It pays off in the long run!
Now, let’s talk installation. If you’re feeling adventurous and have some DIY spirit, you might think about tackling the project yourself. Just keep in mind that Solar Panel Installation can get a bit technical, especially with wiring and connections. If that sounds like too much, hiring a professional could save you time and hassle. Plus, they’ll know local codes and can help with permits.
Finally, don’t forget about maintenance. Once your solar panels are up, a little regular check-up can go a long way. Keep them clean and clear of debris so they can perform at their best. Watching your energy bills drop will be all the reward you need!
Tools You Need for Installation
When you're diving into solar panel installation, having the right tools can make all the difference. It's like cooking without the right utensils—things just get messy. Here’s a handy list of tools you'll want to have on hand to make your solar panel installation smooth and efficient.
Before you start your solar panel installation, take a moment to gather these tools. Having everything ready will help you focus on what really matters: getting those panels up and running to harness the sun's energy smoothly!
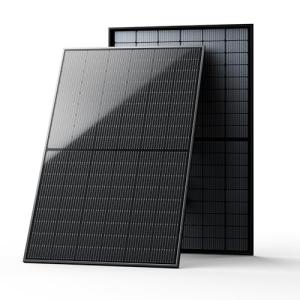
EPOCH 800W Monocrystalline Waterproof Solar Panel
Enjoy reliable and efficient energy production with this durable solar panel designed for all weather conditions
Product information
$649.99 $479.99
Product Review Score
4.41 out of 5 stars
206 reviewsProduct links
Step by Step Installation Process
Ready to get those solar panels up and running? Here's a simple step-by-step guide to make your Solar Panel Installation smooth and straightforward. Let’s break it down!
Step 1: Gather Your Materials
Before you start, make sure you've got everything you need. This includes your solar panels, racking system, inverter, wiring, and basic tools like a ladder, drill, and socket set. Having everything on hand saves you time and hassle.
Step 2: Choose the Perfect Spot
Location matters! Find a spot with plenty of sunlight and no obstructions like trees or buildings. A south-facing roof is usually best. Make sure it’s structurally sound and can support the panels.
Step 3: Install the Racking System
The racking system is how you’ll mount your solar panels, so it needs to be sturdy. Follow the manufacturer’s guidelines to securely attach the racking to the roof. Make sure each part is level and properly spaced.
Step 4: Attach the Solar Panels
Now it’s time to get hands-on! Carefully place each solar panel onto the racking system. Use bolts and screws to secure them tightly. Double-check that everything is aligned and secure before moving on.
Step 5: Connect the Wiring and Inverter
With the panels in place, connect the wiring from each panel to your inverter. The inverter converts the solar energy into usable electricity. Follow the instructions carefully to ensure you’re doing it right. Finally, connect your inverter to your home’s electrical panel.
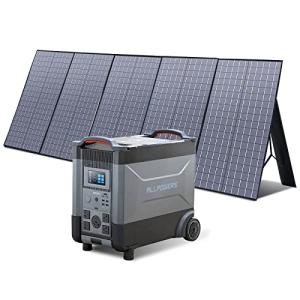
ALLPOWERS 3600W Portable Power Station & Solar Panel
Power up your outings with this versatile solar panel and portable power station combo
Product information
$1,789.00
Product Review Score
4.6 out of 5 stars
9 reviewsProduct links
Common Mistakes to Avoid
When diving into solar panel installation, avoiding some common pitfalls can save you time, money, and headaches. Here are a few mistakes people often make.
First off, don’t rush the planning stage. It’s tempting to jump right into installation, but doing your homework is key. Take your time to assess your energy needs, roof orientation, and available sunlight. Creating a solid plan means you’ll choose the right panels and system for your home.
Next, make sure you check local regulations and permits. Skipping this step can lead to fines or even having to remove your system. Each area has different rules about solar installations, so it’s smart to get informed ahead of time.
Another frequent oversight? Underestimating the installation costs. Many assume it’s just the price of the panels. Remember, consider things like labor, additional materials, and any potential upgrades needed to your electrical system. Having a budget in mind will help keep your project on track.
Lastly, don’t overlook maintenance. After your solar panel installation is complete, ensure you schedule regular check-ups. Keeping the panels clean and functioning well will help you maximize your investment over time.


